Updates!

In light of several changes happening in my life at the moment, I’d like to share my updates and plans for the future.

These last two months have been the busiest months I’ve been through for a long time. I’ve been bouncing around between my part time acoustics job, an IT support job, an internship at a music composing company, helping a few friends record their CDs, and writing my own music. As evidenced by the dates of my latest posts, this sporadic schedule has taken its toll on my blogging. I originally started this blog with the intention of keeping people updated on my musical endeavors, but it has clearly turned into more of a music theory tutorial site than anything.

If writing this blog has taught me anything, it’s that I absolutely love explaining things to people. I believe that the final step in learning a topic is being able to explain it to someone else in a clear way. I also believe that no topic is too basic to revisit. While writing any tutorial post I have to double-check my facts and give myself a little refresher on the topic. I often learn something new even when I refresh myself on something that I feel confident with. This is just another reason for me to keep doing these tutorials, whether they are music related or not. This blog has also shown me that there are plenty of ways I can improve my writing. I look back at older posts every now and then and practically cringe! I always feel as though I’m improving, and there is still much more room for that.

“Alright, what’s your point?”

I’ve done quite a bit of thinking about my plans/dreams/goals for this blog, and I’ve decided that it’s in desperate need of some updating. I plan on either buying it a domain so that I can ditch the “.wordpress.com” extension, or fusing it to the website I currently own, which is www.danflorio.com. Once I make this site more “official”, I want to reorganize my posts to focus more on the tutorials. This would mean editing and reformatting older posts to give them a more professional look, and making them more accessible. My goal is to put together a community for people to learn and discuss with each other, rather than a blog format where posts are scattered all about.

Along with a massive blog reformatting, I’ve considered writing a music theory book geared towards absolute beginners, and/or developing some sort of music theory app.

“So what does this mean? No more posts on this blog?”

For the time being I still plan on tossing up a few posts here and there on this particular blog, but they will remain fairly scarce for a while until I really get my act together. Until that time, I’m still happy to go over any requested topics, so please let me know if you have any! You can post them here, email them to me (dflosounds@gmail.com), send me a tweet (@danfloriomusic), or post on my Facebook page.

Now stop reading this and go back to playing some music.
Project updates and other general chatter

Hello, readers!

First of all, I’ve notice a very slight, yet steady increase in average daily views over the last few months, which is pretty sweet. Thanks to all of you who check back regularly! I originally started this blog to post updates on my current projects, so let me do some of that right now.

BLOG STUFF:

The next series I plan to post about is on ear training. Topics like learning how to distinguish the different intervals (major 3rd, minor 7th, etc), scales, and chords all by ear. If you’re not familiar with ear training, I strongly suggest looking into it.

BACKING TRACK STUFF:

I’ve been working on a backing track for Tiana McKelvy (http://www.tianamckelvy.com/) which will be finished by the end of this week. It’s sort of a rock/R&B/pop feel, and so far includes acoustic/electric guitar, bass, drums, djembe, egg shakers, tambourine, keyboard, and mandolin (and of course eventually her vocals). I’ve got a few more friends lined up who want tracks made for them, but if you or anyone you know is interested in one, feel free to shoot me an e-mail at dflosounds@gmail.com!

UPCOMING ALBUM STUFF:

Over the last few months I’ve been cooking up some ideas for my new album. I’ve been drawing a tremendous amount of inspiration from New York City since I’ve been living here, and I’m sure a lot of that will show up in the music and lyrics. Once in a while I take my mandolin over to central park and improvise for one or two hours at a time, which has so far led to one mandolin-heavy track. What are the main differences between these new songs and the tracks on my first CD, you ask? Well, more djembe, more guest musicians, a little more focus on musicality, and a wider range of styles/energy level between the tracks. Also, I plan on doing 90% of the recording myself, which will pose quite a big challenge that I’m pretty excited to tackle.

So far I have roughly eight ideas for songs, with three or four in an almost-completed state. It’s chuggin’ along.

Again, thanks for all of your support thus far. I’ll close this update with a bit of self advertising. As always if you like what you read, see, or hear, please consider supporting me by following/liking my various pages!

http://www.facebook.com/danfloriomusic

http://www.twitter.com/danfloriomusic

Playing the Fingerboard – The Monster Scale

Hopefully, the last few posts have taught you about modes and helped you understand how to see the different modes in actual guitar scales. Now it’s time to bring everything together.

All I ask of you in this post is to memorize three scale patterns. These three patterns will then connect to each other like a jigsaw puzzle in order to form the monster scale (as I like to call it). Guess what, if you’ve read the first two posts, you already know one of the three!

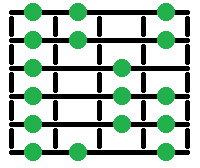
Yes, the first pattern to memorize is this Ionian pattern.

ionian

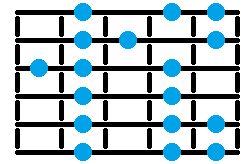
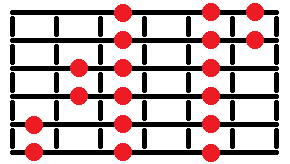
The second is a phrygian pattern. Remember, the phrygian mode takes the same form as a minor scale with a lowered 2nd.

phrygian

Before you learn the third pattern, focus on those two. When you feel comfortable playing them both, it’s time to combine them. Phrygian is the mode you get by starting a major scale from its 3rd scale degree. Therefore, if you start the above phrygian pattern on the 3rd note of the above ionian pattern, you get this:

ionianphrygian

Do you see where I’m getting at here yet? By memorizing certain mode patterns you can piece them together like a puzzle.

Disclaimer: Please don’t get confused by the frets with two dots in them. No, the fret is not divided into micro-notes. I only included both dots to show that those notes are shared between the two patterns.

If you want to play in the key of G, all you have to do is position the first note of the ionian pattern on a G on the low E string. Once you do that, all of those above notes are fair game because they’re all in the key of G! Practice this combination of patterns as much as your brain can handle. Try playing up the ionian section of the pattern, but after you hit the last note play down the phrygian pattern. Come up with your own exercises, there are too many to count.

Yes you guessed it, once you have that under your belt it’s time to add another mode pattern. Now, you could start the next mode pattern from the note furthest to the right on the low E string, which corresponds to the 5th note of the major scale (which would be the mixolydian pattern). However, for visualization purposes I personally recommend skipping that one and adding the aeolian pattern. Don’t worry, the mixolydian scale will still be in there, but the aeolian pattern provides a more distinct way to divide this huge scale up in your head (you’ll see what I mean). Aeolian is also known as “natural minor”, and should be familiar to those of you who have practiced your minor scales. Since we’re connecting our notes on the low E string, we want an aeolian pattern that starts on the low E string. Here you go:

aeolian


Start this pattern to the right of the 5th note on the low E string of the previous pattern. This is what it looks like:

ionianphrygianaeolian

Oh man, we’re getting serious here. So many frets! Every one of those colorful dots can be played in any one key.

“It’s like a whole new world!”

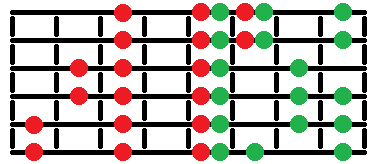
You didn’t think it ended there, did you? We now reach the best part of this whole mess of information. You know what’s cool about the musical scale? It’s cyclical! Once you get to the 8th note of the major scale, you begin playing that exact same scale in the next octave. Notice how on the low E string we have already covered eight notes. Do you know what this means?!?!? You can start this humongous pattern all over again:

monsterscale

Ladies and gentlemen, this is the beauty of the monster scale pattern. That black line on the bottom shows one place where the pattern repeats.

Hint hint:  Do you see how many frets that black line spans? The notes on the guitar repeat every 12 frets. That’s why the 12th fret is almost always marked with a special inlay. This means that if you know where all the playable notes in a key are up to the 12th fret, you know where those notes are across the ENTIRE fingerboard!

If this huge bunch of notes is intimidating to you, just break it down into the different mode patterns. Remember, this isn’t a scale pattern that you have to memorize and play from left to right, bottom to top. The idea is to get away from the mentality that you have to play a confined scale pattern that spans 4 frets while you’re improvising. Think of it as all of the “playable” frets on the fingerboard lighting up for one specific key. You are free to play any of those notes!

Remember, this pattern can be started from anywhere on the fretboard. Whatever note you begin that ionian pattern on represents the major key in which you are playing in. If you want all of these notes to correspond with G major, place the first ionian note on a G! Remember, guitarists read these scale diagrams from left to right, bottom to top. When I say the “first” note in a pattern, I’m talking about the bottom-most, left-most note of that pattern.

Whew. I did my best to explain that as clearly as possible, but if you’re confused about anything please let me know. I’m happy to answer any questions or respond to any issues you may have. I suspect I’ll work a little more on this topic in the future.

Until then, let your fingers run free.

Official website launched

A little while ago I decided to make new music business cards for myself. While designing them, I discovered that I had racked up about 5 or 6 links to online profiles related to my music. As I stubbornly attempted to cram all of the complicated URLs into the business card template file, I began to think, “wow, having one website to link people to would be amazing”. Thus, the quest to make my own website commenced.

I completed that quest today, and you can see the results for yourself:

http://www.danflorio.com

It’s not the prettiest or fanciest of websites, but it provides me with a “home base” to present everything I’ve worked on.

Now run and tell all of your friends about this exciting news!

In other news, I’m just about finished working on a backing track for a friend of mine, and have begin the process of record demos for my next CD. I promise more helpful music blog posts are in the horizon.

Improv Tactics – Record Yourself

Writers have notebooks and word documents.

Illustrators have sketchbooks and Photoshop files.

Photographers have scrapbooks and digital galleries.

Don’t forget that musicians have manuscript paper and sound recordings.

All too often I feel that musicians trying to learn how to improvise neglect this. When practicing any type of art, it’s necessary to jot down your ideas. Music is absolutely no exception.

I have multiple manuscript books filled with random musical ideas. Melody lines, chord progressions, lyrics, etc. I also have hundreds of Finale files and little sound recording snippets on my computer. About 95% of this content is musical “scribble”, if you will. I have audio files that last no longer than 5 seconds and Finale projects with 2 measures of notes.

While for the most part, most of these snippets never grow into a full song, I can’t tell you how many times I have sifted through my “musical scrapbook” and found inspiration. All it takes is a few notes to remind yourself of a great idea you came up with a few months ago, and those few notes will turn into the basis of your next musical creation.

That’s great for songwriting, but I thought this series was for improvising!!!!!!!!

Remember what I said in the first post? In order to improvise, you need to think creatively. Remember what I said in the second post? In order to think creatively, you need to let musical ideas flow through your head all the time. While our brains are capable of storing an enormous amount of information, you can greatly accelerate the speed at which you produce ideas by jotting them down as they come to you.

Alright, so what should you do? First of all, buy a manuscript book. Carry it around with you wherever you play your instrument. Second of all, arm yourself with some means of recording. You don’t need thousand dollar microphones or professional music software if your goal is to quickly record your ideas. Most computers come with microphones built into them now, so all you really need is software to record on.

If you play an electric instrument (electric guitar, bass, etc…) I strongly recommend getting a DI box. This will allow you to plug your instrument right into your computer (very handy if it’s late at night and you don’t want to blast your amp).

As for the computer software, you’ll have to find a convenient list of free software somewhere online to get you started. Good luck with that!

(Just kidding, here you go)

Finale Notepad:  Music notation

MuseScore:  Music notation

Frescobaldi (combined with Lilypond):  Music notation

Audacity:  Audio recording, multi-tracking

Ardour:  Audio recording, multi-tracking

There are many other programs out there, free and non-free. Some programs are better fit for beginners, but try experimenting with anything you can get your hands mouse on. Don’t forget to explore whatever operating system you’re on for any built-in audio recording software. Now go out there and take advantage of modern technology!

Improv Tactics – It’s All In Your Head

Improvisation can be a very daunting concept for beginners. If you want to play your scales faster, you can practice with a metronome. If you want to learn cooler chords, you can look them up in books (or websites). However if you want to improvise, what do you do? What can you practice? What is that “on” switch? It’s different from scales and chords because it’s almost entirely mental.

So how do you “practice” improvisation? Yes, you can practice scale patterns, but those are scale patterns. You can work on your technique, but that’s technique. Scales, chords, technique, etc, are not improvisation. They are a means of transferring your improvised ideas from your head to the audible world. You could improvise with a single note by playing that note however you like, however long you like, at whatever rhythmic pattern you like. You can create a beautiful melody off the top of your head but play it with terrible technique. Does that mean your improvisation is bad? No, that means your technique needs work.

My point is, don’t think that you can’t be “good” at improvising if you don’t know the most hip scales, or have the most amazing technique. Those concepts have their place, and can open new doors for your creative thinking, but in order to really start with improvisation, you have to use your own head.

Think before you shred

I’m absolutely serious when I say that the most useful way to polish up your improvisation is to improvise in your head all the time. Ever since I was a kid, I’ve had melodies playing through my head constantly, melodies that I had made up. When I’m taking a walk, sitting on the subway, or grocery shopping, I sometimes entertain myself by thinking of a chord pattern and a melody to go along with it. Now, I’m not talking about composing symphonies or analyzing atonal theory, I’m talking about whatever comes to mind. Everyone gets songs that other people wrote stuck in their heads, why not your own material?

Here’s the catch. Try not to think too hard about it. The creative side of your brain will freeze in it’s tracks if the analytical side comes knocking. Don’t think of it as an exercise or a chore, just let it happen on it’s own. Maybe you heard a sweet bass line in a song recently, and you can’t get it out of your head? Good, keep it in your head, play around with it. Think of your own spin on it, let it repeat forever. This is your head and you can do whatever you want. Go ahead and remix some Justin Bieber, or come up with a hip hop version of “Mary Had a Little Lamb”. No one can hear your ideas but you, so if you think it sounds stupid, why should you care?

In your head, your fingers don’t get sore, your embouchure doesn’t weaken, and your technical ability doesn’t get in the way. Think out your wildest musical fantasies. What would you want to hear if you took a guitar solo in front of 50,000 screaming fans? A violin solo at Carnegie Hall?

For me, it’s something that I can’t help. I don’t sit down on the train and think “I’m going to write a melody in my head today”, it just happens. It’s the same as getting lost in a daydream. I’m not saying that you will have the exact same experience right away, but I’m willing to bet that if you think creatively long enough, you also won’t be able to help it.

And the reason is…what?

Think about it. Your brain is the source of all improvisation, so it only makes sense that you should start there. All the scales in the world won’t do you any good unless you have improvised music running through your head. Someone who aces AP English can still flunk out of Creative Writing. The idea is that you will eventually have thousands of new ideas flying through your head constantly, so that when it’s your turn to blow people’s faces off at a jam session, it’s just a matter of unleashing those ideas with the scales and chords you’ve been drilling.

If you have any thoughts, opinions, criticisms, or questions on the matter, feel free to comment or shoot me an e-mail. If you like where this series is going, please subscribe to keep updated. Happy thinking.

The Circle of Fifths/Fourths and the notes in each key (Part I)

One of the most important and helpful tools for learning music theory is the Circle of Fifths (also known as the Cycle of Fifths). There are many uses for it, but I will focus on how to use it to determine what accidentals exist in each key, and discuss some ways it can be used for practicing an instrument.

In order to construct the circle of 5ths, start with the note C.

C

Amazing. Now, add the note that is a fifth above C. In other words, add the fifth note from the C major scale. If you know your basic scales, you know that note is a G.

C   G

Next, add the note that is a fifth above G, which is D.

C   G   D

If you continue this pattern, you will find the following notes:

C   G   D   A   E   B   Gb   Db   Ab   Eb   Bb   F   C

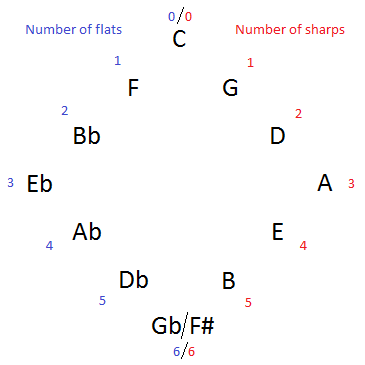
Did you notice that this collection of fifths contains all 12 unique notes from the musical alphabet? Did you also notice that you end up right where you started, at C? I know you’re dying to reformat those notes into a circle, like this:

Alright, so my version is more of a diamond, but it should still get the point across. One thing I should point out is that many people are familiar with the circle going in the opposite direction. If you notice, the cycle moves in fourths if you look at it counter-clockwise (C to F is a fourth, F to Bb is a fourth, etc…). Looking at it this way has it’s own advantages, which I will get to in a moment.

How to know what notes are in each key

Okay, so why should we care about this? Well, let’s say you are told to play an E scale on the fly, but you never actually memorized how to play all of the scales. Sure, you could follow the “whole-whole-half-whole-whole-whole-half” pattern that I discussed in Basic Scale Theory, but you can also use the Circle of Fifths to determine the exact notes to play. Let me start with a new and improved diagram.

All of the red numbers indicate how man sharps are in each key, while all of the blue numbers indicate how many flats are in each key. Remember, Gb and F# are the same key in terms of what you hear, but they are written out differently on sheet music. Now, none of this will make any sense until you understand the order of sharps and flats.

Order of sharps:

F C G D A E B

Order of flats:

B E A D G C F

I’ll explain what these mean in one moment, but just take a second to understand how I obtained each set of notes. To get the order of sharps, start with the note F and go up in fifths until you reach the note B. To get the order of flats, start with the note B and go up in fourths until you get the note F. There are plenty of awesome acronyms you can use to remember these, but I personally use the following:

For the order of sharps:  Fat Crabs Go Deep And Eat Bait

For the order of flats:  Betty Eats And Drinks Good Chocolate Fudge

Of course, you can come up with your own or try to find some online. Either way, memorize these two patterns, for they are vitally important and will get you far in life.

Now to put it all together and find the notes that make up an E major scale. If you look at the Circle of Fifths you can see the number 4 next to the note E. This means that there are 4 sharps in the key of E. What 4 sharps are they, you ask? Simply take the first 4 notes of the order of sharps.

F C G D

This means that every note in the E major scale is “natural” except for F, C, G, and D. Therefore, you can quickly write out the E major scale as:

E   F#   G#   A   B   C#   D#

Do you get it yet? Let’s do an example with flats. Take the Bb major scale. By referring to the Circle of Fifths, we can see the number 2 next to the note Bb, meaning there are 2 flats in the key of Bb. Since we are dealing with flats now, we take the first 2 notes from the order of flats.

B E

Now we can write the Bb major scale as:

Bb   C   D   Eb   F   G   A

Two more examples:

Key of D major:  D has 2 sharps, which are F and C, so the notes in the key are:

D   E   F#   G   A   B   C#

Key of Eb major:  Eb has 3 flats, which are B, E, and A, so the notes in the key are:

Eb   F   G   Ab   Bb   C   D

Right now this might seem like a lot of work, but I can assure you that if you memorize the order of sharps and flats, as well as the circle of fourths and fifths, you will be able to do this process in your head in a matter of seconds. This can also be used to explain key signatures, which I will go over in part 2 of this post.

Using the Circle of Fifths/Fourths for practicing

Not only is this cycle useful for determining the notes in each key, it can also be used as a convenient tool for practicing your instrument. For example, say you are a guitar player and you want to drill through all of the major scales. You can use the cycle to nail every single scale in one seamless, non-stop exercise. Since the interval between guitar strings is a 4th (except from the G to B string), cycling around the circle of 4ths works out pretty well. Here is an example exercise video:

You can apply this method to any exercise you may be working on. It helps you become familiar with the fretboard and it is an efficient way to apply a single pattern to all twelve keys back-to-back. While you could also practice a pattern on all twelve keys sequentially (start on C, go to D, then E, then F, and so on), this method forces you to think a little more, and helps you memorize what notes are a fourth or a fifth apart, which is extremely helpful for a number of reasons, which I may go over in another post. For now, I think this is enough information for one article, so I will leave you to your practicing. I hope this introduction to the Circle of Fifths/Fourths was as mind-blowing for you as it was when I first learned about it. Stay tuned for part 2!

New Video: June Hymn (Cover)

My latest YouTube video is a collaboration with my friend Ashly LaRosa. This is a cover of the song “June Hymn” by The Decemberists. Finding a moment when there were no intruding sounds in the distance while recording outside proved to be incredibly difficult.

Stay tuned for the next music theory post!

Check me out on Facebook

Hey all, short post here. I just got around to making a Facebook page for my music, and I just wanted to share it with whoever is interested.

http://www.facebook.com/danfloriomusic

While not much is on it yet, I will be spiffing it up with pictures, music, and music related videos. If you have any interest in my music, please take a second to “like” the page and show your support!

This is me, some 10 or 11 years ago.

I’m only a few weeks away from college graduation so I’ve got quite a bit on my plate, thus why my posts have been few and far between. I’ll get cracking at more meaningful material as soon as I can. Stay tuned fellas.

How to know which chords to play

Let’s say that after learning the basic chords on the guitar, your other guitar-playing friend invites you to a jam session. You show up with your cheap starter acoustic guitar and sit down to play, head held high with confidence that you can play any chord your friend needs. That’s when your friend says, “alright, let’s jam in C. You play chords first”, then proceeds to count off, expecting you to start strumming whatever comes to your head. If all you’ve ever done was learn separate chords, you will most likely jump to the C chord that you practiced, then proceed to draw a blank as to what to play next. If you read this post and put some effort into learning the content, I assure you that will never happen again.

In order to strip this down to the fundamentals, let’s take a look at the C major scale written out on a staff.

Now, if you’ve read my post on chord theory (or just know the basics of chord theory already), you know that basic chords contain a root, a 3rd, and a 5th. Let’s add those to each of the notes above, but let’s make sure we use only notes from the C major scale (which we know, from basic scale theory, contains no accidentals).

The chords that each group of three notes produce are written on top of the staff in the image above. C, E, and G make a C major chord, while E, G, and B make an E minor chord (it is minor because of the G. If it were a G#, it would be an E major chord. At some point I’ll make a post that talks more about what notes are in each key). For those of you who have trouble reading music notation, here is a list of what is shown above:

Measure 1: Contains C, E, and G, making a C major chord

Measure 2: Contains D, F, and A, making a D minor chord (D major would be D, F#, A)

Measure 3: Contains E, G, and B, making an E minor chord (E major would be E, G#, B)

Measure 4: Contains F, A, and C, making an F major chord

Measure 5: Contains G, B, and D, making a G major chord

Measure 6: Contains A, C, and E, making an A minor chord (A major would be A, C#, E)

Measure 7: Contains B, D, and F, making a B diminished chord (B major would be B, D#, F#)

The roman numerals at the bottom of staff are used to indicate which scale degree the chord is attributed to, as well as the quality of the chord. Upper-case numerals represent the major quality while lower-case represents minor. For example, the numeral “IV” can be interpreted as “the major chord built off of the fourth scale degree”, and the numeral “vi” can be interpreted as “the minor chord built off of the sixth scale degree”. The quality of chords built off of a standard major key will always follow this pattern. Learn it, memorize it, love it, live it:

Major, minor, minor, major, major, minor, diminished

To further prove this, let’s look at the key of Bb major, which contains the two accidentals; Bb and Eb (I’ll explain how I know that in a future tutorial. For now, if you don’t know what accidentals are in each key, refer to my post on basic scale theory to get yourself started). First, like the example above, we will begin with the scale written out on a staff:

Now let’s stack those thirds on top of each note. Remember, since we are in Bb major, any B or E encountered must be flattened!

Amazingly, the chords that are produced follow the exact same pattern I showed you above. The three chord (iii) is minor, the five chord (V) is major, the one chord (I) is major, etc.

So what does all of this mean?

Let’s say you’re jamming with your friend. He is improvising in the key of Bb major. As long as you have the order of chord qualities memorized for a major key, you can whip out any of those chords during the jam session. Start at a Bb, then move to a Gm, then an Eb major, then an F major (I just outlined a very common chord progression known as I-vi-IV-V, or 1 6 4 5). It makes sense when you think about it. We build these chords using only notes from that particular key, so scales being played in that key should sound good* on top of them. Or let’s say you want to write a song. Remembering this order of chord qualities will greatly help you with coming up with a chord progression for the song.

*Disclaimer: “Good” in the sense that they technically work. What sounds good musically to someone is rather subjective, but most people will agree that a major scale played over the chords extracted from the scale sound “correct”.

I realize that this is an oversimplification of this topic, but I think it is a good place to start if you are new at improvising chords. I will certainly make expansions to this tutorial in the future (talking about the different modes, chord movement, specific scales that sound more “in” on top of each chord, adding sevenths to each chord, etc) and I may also re-vamp and improve this post, so stick around.

All feedback, positive and constructively negative, is welcome!