Playing the Fingerboard – Modes on the Guitar

Now that you know about what modes are (and totally didn’t skip through that entire post), it’s time to apply that knowledge to the guitar itself. Keep in mind, the goal of this post is to get you to begin thinking in terms of modes on the guitar. Don’t get too caught up in the theory behind it, as the post following this will bring everything together.

The beauty (or curse) of stringed instruments is that there are multiple ways to play any given scale. This is a very important concept to understand if you want to play across the whole fingerboard. Certain scales span across more frets than others, and all scales have their place. Either way, let’s take a look at one of the most common major scale patterns. Again, let’s assume the key of C.

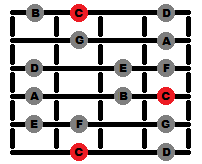
C major

Diagram of a common major scale pattern on the guitar.

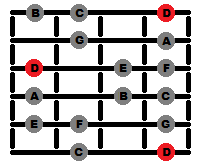
The letter names for C major are included for demonstration purposes, but this shape can be played anywhere on the neck to play in any key.

For those of you that are confused at what you’re looking at, this is a scale diagram meant for the guitar. Imagine that the grid is your fretboard, where the horizontal lines are strings and the vertical lines are the frets. The bottom horizontal line is the low E string, then the A string, D, G, B, and finally the top line represents the high E string. The C’s are highlighted in red because they represent the root note of the scale.

As I mentioned before, if you know how to play this basic major scale, you can play ANY of those modes I mentioned in the last post. It all depends on what your starting note is.

For you visual people, I’ll highlight all the D’s in the pattern instead of the C’s. Remember, the highlighted circles are your root notes.

D Dorian

Diagram of a C major scale on the guitar with D’s as root notes.

By playing this scale with the D’s as your root notes, you’re playing the D dorian mode.  I could go on to highlight the E’s, F’s, G’s, A’s, and B’s, in order to show you the other modes, but I think you get the point. Here, let me drill it into your head even more, this time using pretty colors:

If you start the pattern from the first scale degree (in this case, ), it’s C Ionian.

If you start the pattern from the 2nd scale degree (in this case, D ), it’s D Dorian.

If you start the pattern from the 3rd scale degree (in this case, E ), it’s E Phrygian.

If you start the pattern from the 4th scale degree (in this case, F ), it’s F Lydian.

If you start the pattern from the 5th scale degree (in this case, G ), it’s G Mixolydian.

If you start the pattern from the 6th scale degree (in this case, A ), it’s A Aeolian.

If you start the pattern from the 7th scale degree (in this case, B ), it’s B Locrian.

Got it?

Uh, alright…but I’m still playing over a span of 4 frets. Eddie Van Halen uses more than 4 frets. How can I be Eddie Van Halen with 4 frets?

Baby steps. I know all I’ve done so far is make your pleasant little major scale more complicated, but don’t worry, you’ll thank yourself for understanding this concept later. If you want to cover more frets in one scale, you’ll have to play more notes on each string. Let me introduce you to another major pattern that I personally use the most. Are you ready to stretch your fingers a little?

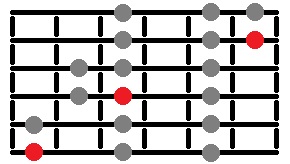
My personal favorite major scale pattern. Remember, by starting on the red notes, you're playing in the Ionian mode.

My personal favorite major scale pattern.

Side note:  Whenever I learn or show someone a new scale or scale pattern, I always imagine the music from Ocarina of Time after you learn a new song on the Ocarina.

linknewsong

You’ve learned Dan’s Favorite Major Scale Pattern!

Sorry if you don’t get that reference. ANYWAY, the idea of this pattern is to play three notes on each string, which successfully covers a whopping six frets when played over two octaves. Again, each red circle represents the root of the scale. If you’re playing a C major scale, each red circle is a C. If you’re playing an F major scale, each red circle is an F.  It all depends where you are on the fretboard. Again, all of that mode stuff applies to this pattern as well. If you start it on a D, it’s D dorian, blah blah blah.

Okay, that pattern covers more frets, but it’s annoying to play and sounds exactly the same as the first pattern!

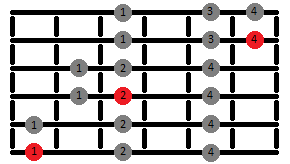
Well, the purpose of this pattern isn’t just to be annoying and look more impressive to play. Think of this scale as the foundation, the starting point, or home base when playing across the whole fingerboard. I’ll explain in the next post, but for now I strongly encourage you to practice this scale. Here is my suggestion for which fingers to use where.
Major form with numbers

Major scale pattern with numbers to indicate which fingers to use. 1 = index finger, 2 = middle finger, 3 = ring finger, 4 = pinky.

If you aren’t used to playing scales like this, you will most likely have trouble with those first 6 notes on the bottom, where you have to stretch apart you index and middle fingers. Just keep at it and it will feel natural in time. Check the next post where I explain why this is my favorite major scale pattern, and how you can piece it together with the patterns of other modes to cover the entire fretboard!
The Circle of Fifths/Fourths and the notes in each key (Part I)

One of the most important and helpful tools for learning music theory is the Circle of Fifths (also known as the Cycle of Fifths). There are many uses for it, but I will focus on how to use it to determine what accidentals exist in each key, and discuss some ways it can be used for practicing an instrument.

In order to construct the circle of 5ths, start with the note C.

C

Amazing. Now, add the note that is a fifth above C. In other words, add the fifth note from the C major scale. If you know your basic scales, you know that note is a G.

C   G

Next, add the note that is a fifth above G, which is D.

C   G   D

If you continue this pattern, you will find the following notes:

C   G   D   A   E   B   Gb   Db   Ab   Eb   Bb   F   C

Did you notice that this collection of fifths contains all 12 unique notes from the musical alphabet? Did you also notice that you end up right where you started, at C? I know you’re dying to reformat those notes into a circle, like this:

Alright, so my version is more of a diamond, but it should still get the point across. One thing I should point out is that many people are familiar with the circle going in the opposite direction. If you notice, the cycle moves in fourths if you look at it counter-clockwise (C to F is a fourth, F to Bb is a fourth, etc…). Looking at it this way has it’s own advantages, which I will get to in a moment.

How to know what notes are in each key

Okay, so why should we care about this? Well, let’s say you are told to play an E scale on the fly, but you never actually memorized how to play all of the scales. Sure, you could follow the “whole-whole-half-whole-whole-whole-half” pattern that I discussed in Basic Scale Theory, but you can also use the Circle of Fifths to determine the exact notes to play. Let me start with a new and improved diagram.

All of the red numbers indicate how man sharps are in each key, while all of the blue numbers indicate how many flats are in each key. Remember, Gb and F# are the same key in terms of what you hear, but they are written out differently on sheet music. Now, none of this will make any sense until you understand the order of sharps and flats.

Order of sharps:

F C G D A E B

Order of flats:

B E A D G C F

I’ll explain what these mean in one moment, but just take a second to understand how I obtained each set of notes. To get the order of sharps, start with the note F and go up in fifths until you reach the note B. To get the order of flats, start with the note B and go up in fourths until you get the note F. There are plenty of awesome acronyms you can use to remember these, but I personally use the following:

For the order of sharps:  Fat Crabs Go Deep And Eat Bait

For the order of flats:  Betty Eats And Drinks Good Chocolate Fudge

Of course, you can come up with your own or try to find some online. Either way, memorize these two patterns, for they are vitally important and will get you far in life.

Now to put it all together and find the notes that make up an E major scale. If you look at the Circle of Fifths you can see the number 4 next to the note E. This means that there are 4 sharps in the key of E. What 4 sharps are they, you ask? Simply take the first 4 notes of the order of sharps.

F C G D

This means that every note in the E major scale is “natural” except for F, C, G, and D. Therefore, you can quickly write out the E major scale as:

E   F#   G#   A   B   C#   D#

Do you get it yet? Let’s do an example with flats. Take the Bb major scale. By referring to the Circle of Fifths, we can see the number 2 next to the note Bb, meaning there are 2 flats in the key of Bb. Since we are dealing with flats now, we take the first 2 notes from the order of flats.

B E

Now we can write the Bb major scale as:

Bb   C   D   Eb   F   G   A

Two more examples:

Key of D major:  D has 2 sharps, which are F and C, so the notes in the key are:

D   E   F#   G   A   B   C#

Key of Eb major:  Eb has 3 flats, which are B, E, and A, so the notes in the key are:

Eb   F   G   Ab   Bb   C   D

Right now this might seem like a lot of work, but I can assure you that if you memorize the order of sharps and flats, as well as the circle of fourths and fifths, you will be able to do this process in your head in a matter of seconds. This can also be used to explain key signatures, which I will go over in part 2 of this post.

Using the Circle of Fifths/Fourths for practicing

Not only is this cycle useful for determining the notes in each key, it can also be used as a convenient tool for practicing your instrument. For example, say you are a guitar player and you want to drill through all of the major scales. You can use the cycle to nail every single scale in one seamless, non-stop exercise. Since the interval between guitar strings is a 4th (except from the G to B string), cycling around the circle of 4ths works out pretty well. Here is an example exercise video:

You can apply this method to any exercise you may be working on. It helps you become familiar with the fretboard and it is an efficient way to apply a single pattern to all twelve keys back-to-back. While you could also practice a pattern on all twelve keys sequentially (start on C, go to D, then E, then F, and so on), this method forces you to think a little more, and helps you memorize what notes are a fourth or a fifth apart, which is extremely helpful for a number of reasons, which I may go over in another post. For now, I think this is enough information for one article, so I will leave you to your practicing. I hope this introduction to the Circle of Fifths/Fourths was as mind-blowing for you as it was when I first learned about it. Stay tuned for part 2!